

How to measure a room for tile: layouts, cuts and boxes
Measure each floor or wall as rectangles and add the areas, then count tiles using the tile size plus one grout joint, add the maker's overage, and round up to whole boxes from the coverage printed on the box. An 8 × 5 ft bathroom floor is 40 sq ft (3.72 m²): 40 tiles of 12 × 12 in with a 1/8 in joint, or 46 once Fireclay Tile's 15% for field tile is added. Before you buy, plan where the cut tiles fall, because the layout decides how much is wasted.
How do you measure a room for tile, step by step?
Tile needs two extra steps compared with plank or carpet: you account for the grout joint, and you plan the layout before you count, because the position of the first tile decides the size of every cut piece.
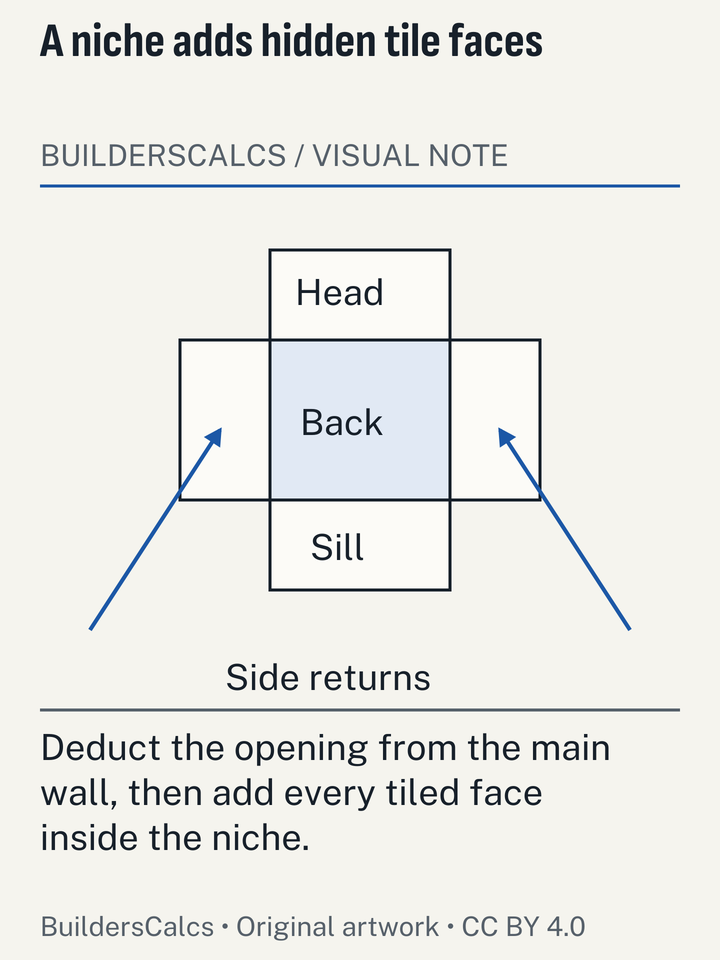
- Measure every surface separately. Floor, each wall, the shower walls, a niche, a backsplash: give each one its own rectangle on the sketch, with its width and the height or length to be tiled.
- Add up the area. Multiply each rectangle out and add them. Split L-shapes and angled corners into rectangles and triangles, as for any floor.
- Find the real tile size. Read the actual size and the coverage per box from the box or data sheet. The nominal size on the label is often not the size of the tile.
- Choose the joint width. Use the tile maker's recommended joint, which can be no narrower than the ANSI minimum and must suit the tile's size variation.
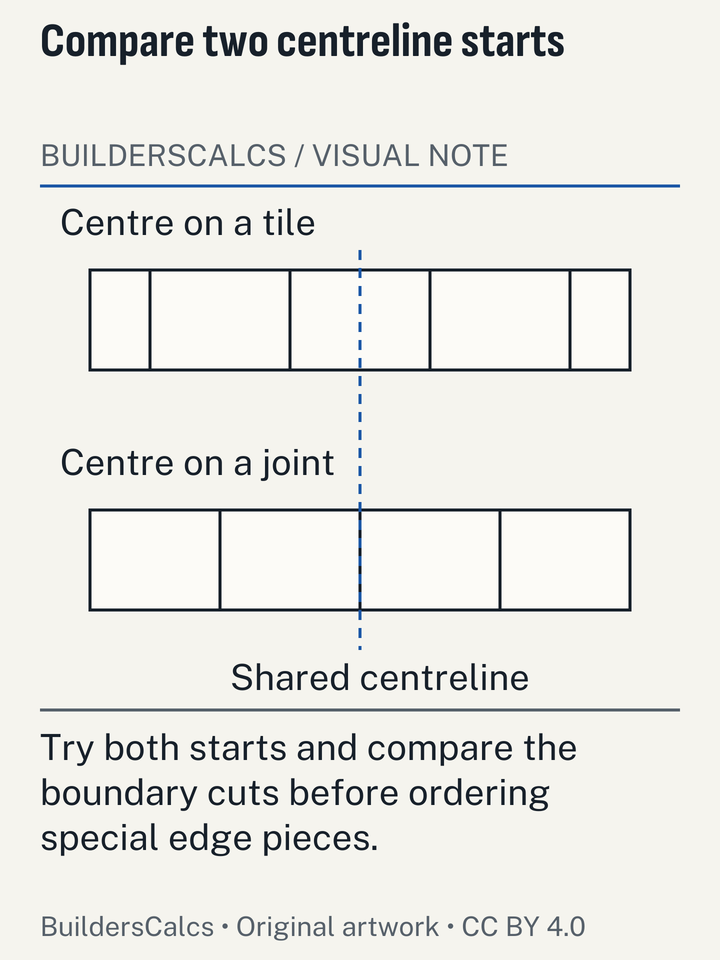
- Plan the layout. Mark a centre line each way and work out the edge cut with a joint on the centre line and with a tile centred on it. Pick the option that leaves the larger edge piece.
- Count the tiles. Divide the area by the area of one tile plus one joint, and round up.
- Add the overage. Multiply by the maker's overage for the layout: more for herringbone and specialty shapes than for a straight lay.
- Convert to boxes. Divide by the pieces or the coverage per box, and round up to a whole box. Buy all boxes from one batch.
How do you measure a floor for tile?
Measure the floor wall to wall at the widest points and split anything that is not a rectangle into simple shapes, the same as for any other flooring. The floor measuring guide covers L-shapes, bay windows and angled corners in detail.
Tile floors have a few extra things to note on the sketch:
- Where the tile stops. Mark the threshold at each doorway. A tiled floor usually ends at a transition strip in the door opening, and the strip's length comes from the door width.
- Fixed items. Mark the toilet flange, the tub or shower tray edge and any built-in vanity. Tiling around a fixed item does not change the area much, but every tile that meets it needs a cut, and cuts are where the overage goes.
- Floor heights. Tile, mortar bed and any backer board add height. Note door bottoms and the height of the next floor so the change in level is not a surprise.
Measuring at floor level, not at hand height, matters more for tile than for plank. A tile layout is set out from straight lines, so a wall that bows by half an inch shows up as a tapering cut along its length.
How do you measure walls and a shower for tile?
Treat each wall as its own rectangle: the width of the wall times the height the tile will reach. Do not average the walls together. A shower with a 60 in back wall and two 32 in side walls, tiled to 84 in, is (60 + 32 + 32) × 84 = 10,416 sq in, or 72.3 sq ft (6.72 m²).
- Openings. Subtract a window or a doorway when it is large, but leave small openings such as a valve or a shower head in the count; the pieces around them are mostly cut anyway.
- Niches. A recessed niche adds area. Its back is width × height, and its four returns are the niche's perimeter × its depth. A 12 × 24 in niche 3.5 in deep adds 2 sq ft at the back and 72 × 3.5 = 252 sq in (1.75 sq ft) of returns.
- Edges and trim. Bullnose, pencil trim or metal edge profiles are bought by length. Measure every exposed tile edge, outside corner and niche edge in linear feet or metres.
- Backsplashes. Measure along the worktop, then the height from the worktop to the underside of the wall units or to the finish line. Subtract the cooker hood or window only if it is large.
Wall tile is ordered by the same overage and box rules as floor tile, but keep wall and floor totals separate. They are often different tiles, and even when they are the same, a wall layout has different cuts.
Why does the grout joint change the tile count?
Each tile covers its own area plus a share of the joint around it, so the count is the area divided by (tile length + joint) × (tile width + joint) (Ceramic Tile Education Foundation (CTEF) and TileLetter (National Tile Contractors Association)). Leaving the joint out overstates the number of tiles, and the effect grows as the tile gets smaller.
On a 40 sq ft (5,760 sq in) floor with 4-1/4 in tile, the bare tile area of 18.06 sq in gives 319 tiles. With a 1/8 in joint, each tile occupies 4.375 × 4.375 = 19.14 sq in, and the count drops to 301, about 6% fewer. On the same floor with 12 × 12 in tile the difference is about 2%. Either way, round up only once, after the overage.
How wide can the joint be?
The joint is not a free choice. The US installation standard sets limits. ANSI A108.02 4.3.8: no grout joint may be narrower than 1/16 in (1.6 mm). (Ceramic Tile Education Foundation (CTEF) and TileLetter (National Tile Contractors Association)) ANSI A108.02: the joint must be at least 3 times the actual facial-size variation of the tile supplied (1/16 in variation means 3/16 in joint). (Ceramic Tile Education Foundation (CTEF)) For running-bond layouts with any side over 15 in, ANSI requires on average at least 1/8 in joints for rectified and 3/16 in for calibrated tile. (Ceramic Tile Education Foundation (CTEF) and TileLetter (National Tile Contractors Association))
One common belief is that rectified tile can be set with a hairline joint. ANSI's absolute minimum still applies, and for large rectified tile in a running bond the average must be wider again (Ceramic Tile Education Foundation (CTEF) and TileLetter (National Tile Contractors Association)). Use the joint the tile maker recommends, and put that figure into the count.
Is a 12 × 12 tile really 12 in square?
Often not. US tile is sold in nominal inch sizes, and the actual tile can be smaller. Custom Building Products' coverage chart lists each nominal size beside a metric size, so a 12 × 12 sits next to 300 × 300 mm, which is 11.81 in (Custom Building Products). That is why the site's tile data say a 12 × 24 tile does not cover exactly 2 sq ft, and why the coverage printed on the box is the number to trust (Marazzi Group (Italy) and Custom Building Products).
The difference matters more now that most US tile is made abroad. TCNA reports that US ceramic tile consumption was 2.57 billion sq ft in 2025, down 4.9% from 2.70 billion in 2024, with imports making up 72.4% of volume (TCNA, March 2026). (Tile Council of North America (TCNA)) Those are national figures for all ceramic tile, not a measure of any one product, but with imports making up most of the volume, a tile made to a metric size and labelled in nominal inches is a common case. Measure a tile from the box, or read the data sheet, before you plan the layout. The US and European tile size chart lists the nominal and metric pairs.
| Nominal size | Length (in) | Width (in) | Metric size listed (mm) |
|---|---|---|---|
| 1 x 1 | 1 | 1 | 25 x 25 |
| 2 x 2 | 2 | 2 | 50 x 50 |
| 3 x 3 | 3 | 3 | 75 x 75 |
| 4-1/4 x 4-1/4 | 4.25 | 4.25 | 100 x 100 |
| 6 x 6 | 6 | 6 | 150 x 150 |
| 8 x 8 | 8 | 8 | 200 x 200 |
| 12 x 12 | 12 | 12 | 300 x 300 |
| 16 x 16 | 16 | 16 | 400 x 400 |
| 20 x 20 | 20 | 20 | 500 x 500 |
| 24 x 24 | 24 | 24 | 600 x 600 |
How do you plan the layout so the cuts work?
Mark a centre line across the room, then work out the edge cut two ways: with a grout joint on the centre line, and with a tile centred on it. Use whichever leaves the larger piece at the walls. Nothing about this is a rule of taste. It is arithmetic with the tile-plus-joint module, and it often changes which tiles are cut and how many are wasted.
Example 1: 600 mm tile across a 2.4 m floor
Each tile plus a 3 mm joint takes 603 mm. From the centre line to the wall is 1,200 mm.
- Joint on the centre line: 1,200 − 1.5 (half joint) − 600 − 3 = 595.5 mm left, so the edge piece is about 595 mm, nearly a whole tile.
- Tile centred on the line: 1,200 − 300 (half tile) − 3 − 600 − 3 = 294 mm left, so the edge piece is about 294 mm, under half a tile.
Here the joint on the centre line wins: four tiles across, all close to full width, instead of five pieces with two narrow cuts.
Example 2: 12 in tile across a 5 ft floor
Each tile plus a 1/8 in joint takes 12.125 in. From the centre line to the wall is 30 in.
- Joint on the centre line: 30 − 0.0625 − 12 − 0.125 − 12 − 0.125 = 5.69 in, a strip under half a tile.
- Tile centred on the line: 30 − 6 − 0.125 − 12 − 0.125 = 11.75 in, almost a full tile.
This time centring a tile wins. The same method, applied the other way across the room, sets the cuts along the remaining walls. Check against the sketch that the larger pieces land where people will see them, usually the doorway and the longest open wall, since the edges under a vanity are hidden. The edge pieces above are before any gap the tile maker asks you to leave at the walls.
How many tiles and boxes do you need?
Count tiles, add the overage, then divide by the pieces per box and round up. Or skip the tile count and divide the area plus overage by the coverage per box. Both give the same answer when the box coverage is accurate (Marazzi Group (Italy) and Custom Building Products).
US example: an 8 × 5 ft bathroom
- Area: 8 × 5 = 40 sq ft (3.72 m²), or 5,760 sq in.
- Module: 12 in tile + 1/8 in joint = 12.125 in, so 147.0 sq in per tile.
- Tiles: 5,760 ÷ 147.0 = 39.2, so 40.
- With Fireclay's 15% for field tile: 39.2 × 1.15 = 45.1, so 46 tiles.
- Boxes: divide 46 by the pieces in one box and round up. US box counts vary by product and could only be found on retailer listings, so read the box.
Metric example: a 3.0 × 2.4 m kitchen
- Area: 7.2 m² (77.5 sq ft).
- With 15%: 8.28 m².
- Marazzi packs its 60 × 60 cm tile 3 to a box covering 1.08 m² (Marazzi Group (Italy)), so 8.28 ÷ 1.08 = 7.7, which rounds up to 8 boxes, or 24 tiles.
- Cross-check by count: each tile with a 3 mm joint takes 0.364 m², so 7.2 ÷ 0.364 = 19.8 tiles, or 22.8 with the overage. Eight boxes holds 24, so the two methods agree.
For herringbone, parquet and specialty shapes, Fireclay raises the overage to 20% (Fireclay Tile). No tile maker or TCNA figure for diagonal layouts was found, so the waste factor table shows how other materials treat diagonals. The tiles needed for a floor or shower wall tool runs both methods and lets you set the joint and the overage.
| Format (cm) | Pieces per box | m² per box | kg per box | Thickness (mm) |
|---|---|---|---|---|
| 75x75 | 2 | 1.13 | 24.98 | 10 |
| 60x60 | 3 | 1.08 | 21.01 | 9.5 |
| 30x60 | 6 | 1.08 | 21.07 | 9.5 |
| 60x60 (20 mm outdoor) | 2 | 0.72 | 33.53 | 20 |
Does the same measurement give you thinset and grout?
Yes. The area you measured, without the tile overage, is what the thinset and grout calculations need, though each also depends on something else. Thinset coverage depends on the trowel notch. Custom VersaBond: 90-100 sq ft per 50 lb with a 1/4 x 1/4 in square notch, 60-67 with 1/4 x 3/8, 42-47 with 1/2 x 1/2. LATICRETE 253 Gold: 80-95 sq ft (7.4-8.8 m2) per 50 lb with 1/4 x 1/4 in notch; 60-70 sq ft (5.6-6.5 m2) with 1/4 x 3/8 in. (Custom Building Products, LATICRETE International and others) So the same floor can take about twice as many bags with a large notch as with a small one, and brands differ a little at each size.
Grout depends on the joint width and depth and the tile size, which is why manufacturers publish it as a chart rather than a single figure. Custom's Polyblend chart and MAPEI's consumption formula both start from the same joint geometry you used to count the tiles (Custom Building Products). Keep the joint width on the sketch, because the grout order needs it.
In the UK, adhesive is quoted in kilograms per square metre: UK weberset plus uses about 3.0 kg/m2 with a 6 x 6 mm notched trowel, 4.5 kg/m2 for a 3 mm solid bed. (Saint-Gobain Weber (UK))
When does the measurement not hold up?
- The tile is not the size on the label. Plan and count with the actual size from the box.
- The room is out of square. A wall that runs off by half a tile across the room leaves a tapered cut. Measure both diagonals; if they differ, set the layout from the most visible wall and let the taper fall at the least visible one.
- Patterned layouts. Herringbone, chevron, and mixed-size patterns cut far more tiles. Fireclay's higher overage is a starting point, not a guarantee.
- Large-format tile. Big tiles leave bigger offcuts that cannot be reused elsewhere, and ANSI's joint rules change above 15 in (Ceramic Tile Education Foundation (CTEF)).
- Repairs later. A spare box kept back is the only reliable match for a cracked tile in a few years' time, because batches vary in shade.
None of these change the area. They change the overage, so decide on them before you order.
What is different for UK and European tile?
European tile is sold in centimetre formats. Common European porcelain formats include 30x60, 60x60, 75x75 and 60x120 cm (Marazzi, Mapei tables). (Marazzi Group (Italy) and MAPEI S.p.A.) Box coverage is printed in square metres, so measure in metres from the start and skip the inch conversion entirely. UK tile formats and box sizes were not researched separately for this site, so read the box for any UK range. Adhesive and grout are quoted in kg/m² rather than square feet per bag, and the layout arithmetic above works the same in millimetres.
What should you have before you buy tile?
A sketch with each surface measured, the actual tile size, the joint width, a chosen layout with its edge cuts worked out, and the overage for that layout. With those, the box count is a single division. For the floor area itself, the square footage for flooring tools add up rooms of any shape, and the tile calculator turns the result into tiles, boxes, thinset and grout.
Tile measuring questions
Should I subtract the toilet and vanity when measuring for tile?
Not the toilet: the floor under it is usually tiled, and the cuts around the flange use the overage anyway. A fixed vanity on a solid base can be left out of the area, but only if you are sure it will never be moved.
How do I measure a shower for tile?
Measure each wall separately as width × the height to be tiled, add a niche's back and its returns, and measure every exposed edge in linear feet for trim. Measure the shower floor on its own, because it is often a smaller mosaic.
Do I include the grout joint when counting tiles?
Yes. Each tile occupies its own size plus one joint in each direction. Ignoring the joint overstates the count, by about 6% for 4-1/4 in tile with a 1/8 in joint and less for larger tile.
Where should I start tiling a room?
From the centre line, after working out which of the two layouts leaves the larger cut at the walls. Then check that the full or near-full pieces fall at the doorway and the most visible wall.
Why does a herringbone floor need more tile than a straight lay?
Every tile at the edge of a herringbone field is cut at an angle, and many offcuts are too small to use elsewhere. Fireclay Tile raises its overage from 15% for field tile to 20% for herringbone, parquet and specialty shapes.
Sources (12)
- Ceramic Tile Education Foundation (CTEF)
- ANSI Standards: A Tile Installer's Best Friend (quotes ANSI A108.02 4.3.8), checked
- Custom Building Products
- Polyblend Sanded / Non-Sanded Grout color card and coverage chart (©2011), checked
- VersaBond Professional Tile Mortar product page - coverage table, checked
- Fireclay Tile
- Tile School: How to Avoid an Add-On Order, checked
- LATICRETE International
- 253 GOLD sell sheet DS-167.6-EN-SP-0726 (©2026), checked
- MAPEI Corporation
- Ultraflex 2 technical data sheet (version Aug. 5, 2013), checked
- MAPEI S.p.A.
- Ultracolor Plus technical data sheet (GB) - consumption table and formula, checked
- Marazzi Group (Italy)
- Plaster collection catalogue - formats and packing table, checked
- Saint-Gobain Weber (UK)
- weberset plus tile adhesive - NBS Source product data, checked
- The Quikrete Companies
- Safety Data Sheet C1: Portland Cement Based Concrete Products (rev. Feb-23), checked
- Tile Council of North America (TCNA)
- 2025 U.S. Ceramic Tile Market Update (press release, 31 March 2026), checked
- TileLetter (National Tile Contractors Association)
- About Grout Joint Width, checked
Every number on this page is taken from these documents. How we choose and check sources.